

How To Set Coordinate For Animation Maya
Basic Animation Exercise
Now that you have learned how to model, shade, and light objects in Maya, it is time for you to learn how to make these objects move. Earlier continuing this exercise, download and open ball.ma, a scene containing a simple ball. Nosotros by and large animate in thirty frames per second, and so click the Animation Preferences button ( ), go to the Settings category, and make sure Time is set up to NTSC (30 fps).
Also, for the purpose of this exercise, in Animation Preferences get to the Blitheness category then set Default in tangent to Clamped and Default out tangent to Stepped.
The Timeline
Placed straight below the viewport, the timeline is the most visible animation tool in Maya. Though relatively elementary information technology is extremely useful. You lot can call back of it equally a summary of your animation. The dark gray bar is chosen the time slider. Its position represents the scene's current animation frame, data also indicated past the value on the correct. To change the slider'south position, simply left click anywhere on the timeline. You tin also "scrub" the slider across the timeline past left clicking and dragging the mouse left and right.

Below the timeline are the range values. The two outtermost numbers (1.00, threescore.00) are the start and terminate times of the unabridged animation, while the inner numbers (1.00, xxx.00) designate the part of our animation that the timeline shows. Essentially, the timeline is just a window into the overall blitheness of the scene. To motility this window, you can dispense the gray bar inbetween the range values. Left click and drag the centre of the bar to movement information technology around, or drag one of the two pocket-sized boxes to resize it. You can also only edit the values manually.

To the right of the timeline are the playback controls. Click ![]() or
or ![]() to play the time slider either backwards or forwards respectively. You can alter the playback options by right clicking on the timeline and choosing Playback Speed → Real-time or Play Every Frame. For now make sure that the playback speed is set to Existent-time, every bit information technology is the best approximation of your animation'southward timing, whereas the timing of Play Every Frame is variable.
to play the time slider either backwards or forwards respectively. You can alter the playback options by right clicking on the timeline and choosing Playback Speed → Real-time or Play Every Frame. For now make sure that the playback speed is set to Existent-time, every bit information technology is the best approximation of your animation'southward timing, whereas the timing of Play Every Frame is variable.
Click ![]() or
or ![]() to send the time slider to the beginning or the end of the playback range, and
to send the time slider to the beginning or the end of the playback range, and ![]() or
or ![]() to step the time slider back or forward ane frame.
to step the time slider back or forward ane frame.

Keyframes
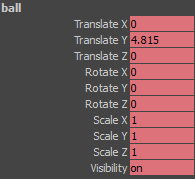
Maya uses "keyframes" for animation (we also refer to them in curt as "keys"). A keyframe is basically a marker used to specify an object's position and attributes at a given point in fourth dimension. To prepare a keyframe on the ball at the current frame, select the ball and go to Animate → Prepare Central (or simply hit southward). A cherry tick marking should announced on the timeline near the slider, indicating that y'all have "keyed" the ball on the electric current frame. You may also notice that the attributes in the Aqueduct Box accept turned pink, an indication that the object has been keyed. The Channel Box's role in keyframing will be explained in further particular a little later.
Try setting another keyframe. Move the time slider to a different frame and use the translate tool to alter the ball's position before keying. After you fix the cardinal, scrub the fourth dimension slider back and forth across the timeline. The ball should switch betwixt its old and new positions. Notation that the keyframes are probably set to "stepped" mode, which means that a keyframe will stay in effect until the next key is reached. (Culling modes of keyframe interpolation volition be discussed in the Graph Editor Exercise.)
For the sake of testing, create several more keys randomly along the timeline:

Note that the timeline will only display keyframes of the object you have selected. If you deselect the ball, the keys will disappear from the timeline until you reselect it. Conversely, if you lot selected more than one animated object, the keyframes of all the combined objects would be displayed on the timeline. This is something to keep in mind, every bit in that situation it may exist difficult to tell which central belongs to which object and how many keyframes a single red tick may represent.
If you want to movement quickly between the keyframes currently displayed, click ![]() or
or ![]() on the playback controls, or simply utilize your keyboard's "carrot" keys (comma and period).
on the playback controls, or simply utilize your keyboard's "carrot" keys (comma and period).
To change the ball's position on an existing key, shift the time slider back to the appropriate frame, motion the ball to the desired location, and fix the primal again - thus replacing the cardinal's previous values. Always remember that you must set the key once again to save your object'southward new position. If you exercise not, moving the fourth dimension slider volition discard your changes. That is, unless you enable autokey.
Autokey automatically saves the changes you make to an object's keyframes. If the current frame already has a key, autokey volition immediately update the key with your changes. If the electric current frame does not take a key, autokey will automatically create a keyframe based on your adjustments (this but works on objects with existing keys). However, be aware that with autokey it is like shooting fish in a barrel to accidently create stray keys on the timeline or make changes you did not intend. Though information technology is recommended you practice not utilise autokey before fully familiarizing yourself with the animation workflow, you can enable it by clicking the  icon below the playback settings. It will appear every bit
  one time turned on.
To delete a key, move the slider to the offending frame, correct click on the timeline and select Delete. Sometimes yous will want to delete or move a grouping of keys all at one time. To accomplish this, y'all first need to select a portion of the timeline. Hold down shift then left click drag over the keys you want to work with. The selection should look something like this:

To move this group of keys simply left click the centre arrows and elevate. You can too calibration the group, a quick way to speed upwardly or slow downwardly an animation, by moving the selection's outter arrows. Be careful when scaling keys, though; as y'all will terminate up with keys on that are on fractions of frames:

In general you never want keys on fractions of frames equally they tend to arrive the manner and are more difficult to work with. The easiest way fix to this problem is to select the keys, remember the correct click menu, and choose Snap. This will snap each central to the closest whole frame number.
Channel Box
As pointed out before, keying the ball volition crusade all of its attributes in the Aqueduct Box to plow pink. Yet, it is of import to annotation that the ball itself is not beingness keyed. Its attributes are. When you lot hit s to set a keyframe on an object, you are actually setting a cardinal for each individual attribute (usually each aspect visible in the Channel Box).
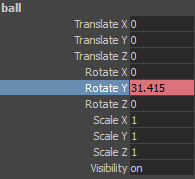
One implication of this is that y'all can cardinal a single aspect. Go ahead and delete all of the brawl's keyframes. Y'all tin can either do this through the timeline, or you can select all of the attributes in the Aqueduct Box (left click Translate Ten and drag down to Visibility), call up the correct click bill of fare, and choose Delete Selected. The attributes should turn dark grey, signifying they no longer have keyframes on them. Correct click on any attribute and choose Key Selected. Only like the Set Key operation it will create a fundamental on the current frame, but now only for the selected aspect:
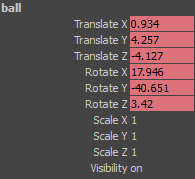
You lot tin can as well make a particular attribute "Not-keyable", which prevents it from being affected by Set up Key. For case, this is particularly useful for the Visibility attribute, every bit most of the time yous do not want to worry well-nigh accidently animating it on and off. To brand an attribute Not-keyable right click it and choose Make Selected Nonkeyable. Its value should turn the same color as the surrounding channel box as shown below. If the attribute had existing keyframes they will still be there, even so yous will not be able to edit them. If the aspect had no keys, you tin can edit it equally a constant value simply it cannot exist keyed. You can make the attribute keyable once again at any fourth dimension by choosing Brand Selected Keyable.
Playblasting
Once you take a number of keyframes you volition want to review your motion. Playblasts are Maya's style of creating a preview of your blitheness that runs in real time and is much faster to create than a render. Go to Window → Playblast options. Change the Brandish size to "Custom" and enter 640 and 480 for the two values. Change the scale to "1.00", and check "Save to File" and name it appropriately. If you practise non specify a save path, Maya will output it to your current projection directory.
When playblasting character motion that somebody else is going to review (for both plow-in and production), you volition want to take extra intendance to make a "make clean" playblast. In the playblast options uncheck Show ornaments. Make certain the camera is a reasonable distance from your blithe object/character. Information technology shouldn't exist so far away that you can barely see the motion, but it also shouldn't be so shut-upwardly that part of it gets cutting off. Also, if at that place are whatsoever animation controls, lights, locators, etc. cluttering the scene y'all will want to hibernate those. An like shooting fish in a barrel way to do this temporarily is to go the viewport you lot are going to playblast from, and then select Show → None. Later that, select Bear witness → Polygons (every bit blithe characters are ordinarily polygonal).
Now that you have learned about keyframing, how to utilise the timeline, and how to preview your blitheness with playblasts yous volition need to review the Graph Editor Exercise to learn near "splining" your keyframes.
Source: https://courses.cs.washington.edu/courses/cse458/11au/content/exercises/basic_animation_exercise.html
Posted by: wrighthatelve.blogspot.com
0 Response to "How To Set Coordinate For Animation Maya"
Post a Comment